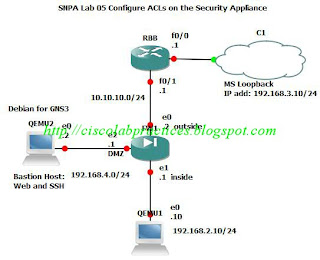
Activity Objective:
- Disable pinging to an interface (inside interface).
- Configure an inbound ACL.
- Test and verify the inbound ACL.
- Configure and an outbound ACL.
- Test and verify the outbound ACL.
- Filter malicious active code.
Can pinging to Inside interface from QEMU1 (Insidehost)
By default, pinging through the security appliance to a security appliance interface (outside interface) is not allowed.
Use the icmp command to prevent pinging to the inside interface.
pixP(config)# icmp deny any echo inside
pixP(config)# show run icmp
icmp unreachable rate-limit 1 burst-size 1
icmp deny any echo inside
(image)
Enable pinging to the inside interface of your security appliance.
pixP(config)# clear configure icmp
Một cách khác là sử dụng access-list để tạo, như sau:
Task 2: Configure an Inbound ACL
Hoàn tất các bước sau đây:
- Allow inbound web traffic from a peer pod network to your bastion host
- Allow inbound FTP traffic from a peer pod internal host to your bastion host
- Allow inbound web traffic to your inside host
- Allow inbound pings to your inside host and bastion host
- Allow ICMP echo-replies from hosts on the outside and DMZ interfaces
- Deny all other inbound traffic
pixP(config)# static (dmz,outside) 10.10.10.11 bastionhost netmask 255.255.255.255
pixP(config)# static (inside,outside) 10.10.10.10 insidehost netmask 255.255.255.255
Create an ACL to permit inbound web and SSH (or FTP) access to your bastion host.
pixP(config)# access-list ACLIN permit tcp 192.168.3.0 255.255.255.0 host 10.10.10.11 eq www
pixP(config)# access-list ACLIN permit tcp host 192.168.3.10 host 10.10.10.11 eq ssh
pixP(config)# access-list ACLIN permit tcp host 192.168.3.10 host 10.10.10.11 eq ftp
Add commands to permit inbound web traffic to the inside host, permit inbound pings, permit ICMP echo-replies to the inside host, and deny all other traffic from the Internet.
pixP(config)# access-list ACLIN permit tcp any host 10.10.10.10 eq www
pixP(config)# access-list ACLIN permit icmp any any echo
pixP(config)# access-list ACLIN permit icmp any host 10.10.10.10 echo-reply
pixP(config)# access-list ACLIN deny ip any any
Bind the ACL to the outside interface.
pixP(config)# access-group ACLIN in interface outside
Create an ACL to allow ICMP echo-replies from the bastion host.
pixP(config)# access-list ICMPDMZ permit icmp host bastionhost any echo-reply
Bind the new ACL to the DMZ interface.
pixP(config)# access-group ICMPDMZ in interface dmz
Display the ACL and observe the hit counts and line numbers.
pixP(config)# show access-list
Task 3: Test and Verify the Inbound ACL
Use the web browser to access the bastion host of your peer pod group: enter http://10.10.10.11
(image)
Pinging form outside, found 10.10.10.11
(image)
pixfirewall# show xlate
2 in use, 2 most used
Global 10.10.10.11 Local bastionhost
Global 10.10.10.10 Local insidehost
Task 4: Configure and Test a Time-Based ACL
- Complete the following steps to configure ACLs:
- Define a time range group
- Define an absolute and periodic time range for the group
- Apply the group time range to an ACL
(refer to document)
Task 5: Configure an Outbound ACL
Complete the following steps to configure ACLs:
- Deny outbound web traffic
- Allow outbound FTP traffic from your internal network to 172.26.26.50 (in here, allow outbound Telnet traffic your internal network to 10.10.10.1 of BBR router).
Create an ACL that prevents users on the internal network from making outbound HTTP connections. And add an additional command to the ACL to permit outbound Telnet access to host 10.10.10.1.
pixP(config)# access-list ACLOUT deny tcp any any eq www
pixP(config)# access-list ACLOUT permit tcp 192.168.2.0 255.255.255.0 host 10.10.10.1 eq 23
pixP(config)# access-list ACLOUT deny ip any any
Enter the access-group command to create an access group that will bind the ACL to an interface.
pixP(config)# access-group ACLOUT in interface inside
Display the ACL you configured, and observe the hit count
pixP(config)# show access-list
Summary:
The security appliance supports the following two main types of address translations:
- Dynamic translation: Translates host addresses on more secure interfaces to a range or pool of IP addresses on a less secure interface. This allows internal users to share registered IP addresses and hides internal addresses from view on the public Internet.
- Static translation: Provides a permanent, one-to-one mapping between an IP address on a more secure interface and an IP address on a less secure interface. This allows an inside host to access a less secure host, a server on the Internet, for example, without exposing the actual IP address. Examples of static translation are static NAT and identity NAT.
fw1(config)# nat (inside) 1 10.0.0.0 255.255.255.0
fw1(config)# nat (dmz) 1 172.16.0.0 255.255.255.0
fw1(config)# global (outside) 1 192.168.0.20-192.168.0.254 netmask 255.255.255.0
fw1(config)# global (dmz) 1 172.16.0.20-172.16.0.254 netmask 255.255.255.0
PAT Using Outside Interface Address:
fw1(configs)# interface ethernet0
fw1(configs-if)# ip address inside 10.0.0.1 255.255.255.0
fw1(configs-if)# ip address outside dhcp
fw1(configs)# nat (inside) 1 10.0.0.0 255.255.0.0
fw1(config)# global (outside) 1 interface
ACLs can work in both directions, but are evaluated only once per connection. After an ACL is configured, it is activated with an access-group command. If no ACL is attached to an interface, then outbound traffic is permitted by default unless explicitly denied and inbound traffic is denied by default unless explicitly permitted.
Only one ACL can be bound to an interface using the access-group command.
Only one ACL can be bound to an interface using the access-group command.


0 comments
Post a Comment